
Series 3 dataTaker Universal DataLoggers
Series 3 dataTaker dataloggers are popular for their communications functionality and for their ease of programming using the built-in dEX software. In our latest Technical Article, we show you how to assign password protection to your dataTaker DT80 series logger and how to limit access to its interface if desired.
1. Setting Changes (in dEX Software)
NOTE: The changes specified in this document require your logger to be running firmware version 9.08 or above. You can update to the latest version on our dataTaker downloads page.
If your data logger was configured using dEX, then the security settings are all located in the Security tab (click on the model # at the top of the tree, then on the Security tab).
1.1 Password Protect the inbuilt FTP Server
The FTP server is one of the two key methods for changing settings on your dataTaker data logger. The most important change when locking down the dataTaker web services is to prevent unauthorized access to this server. The recommended action here is to change the default FTP username and password and to disable anonymous access.
1.2 Password Protect the Command Port
Adding a password prevents your data logger from accepting unauthorized commands. Once a password is set and the user is signed off, the dataTaker will not respond to commands. To access the command interface on a password-protected logger, you must type the password and then press Enter. The command window is available within in the Monitor the logger interface.
The Delay before locking period determines the time before users are locked out of the command interface. When this time expires, the user will need to re-enter the password.
2. Settings Changes (Command Language)
The below commands in dEX are equivalent to those mentioned in the previous section and should be put within a jobs code so that they are reinstated if the power to the logger is cycled:
PROFILE FTP_SERVER ALLOW_ANONYMOUS=NO
PROFILE FTP_SERVER USER=DATATAKER
PROFILE FTP_SERVER PASSWORD=NEWPASSWORD
P14=120 ‘delay before locking
PASSWORD=”MYPASSWORD”
NOTE: The above commands.
3. Limit Access to the ‘Monitor the Logger’ Interface
The monitor the logger interface is configured from the Customize dEX menu on the datalogger home page.
3.1 Hide Certain Diagnostic Features to Keep the FTP Password Safe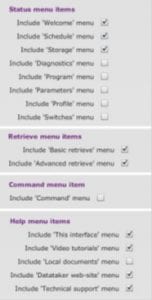
Enter the settings as shown for each of the menus. These options will remove some parts of the web interface where a user might be able to view profile settings and see the FTP password.
The local documents link will not work because we have removed the FTP anonymous user, so it should be removed too.
Save the changes by clicking Save Settings.
3.2 Prevent Editing of Mimics
After you have added all of the mimics you wish to use in the web interface, you will want to prevent users from changing them. To do this, you will need to re-enter the Customize dEX menu and uncheck the box next to Allow changes to mimics in the Security page.
Save the changes by clicking Save Settings.
4. Hiding the ‘Logger Home’ Menu Items
Now that all of the settings have been saved, you will want to hide the Customize dEX menu. To do this, open Windows Explorer and log into your dataTaker’s FTP server. Use the IP address of your logger, user name and password you created in the profile earlier.
Once logged in, open the WWW folder and rename the folder ‘needa’ to anything else (eg. needa1234). Next time the logger home screen is shown, the Customize dEX menu will not be shown and will not be accessible (it may be necessary to clear the browser cache for this page to reload correctly). It is also possible to hide the Configure the logger menu item using the same process but renaming the folder “jango” instead of “needa”.