
Reduce Measurement Errors in your Application
 At CAS DataLoggers we often receive calls from users working in resistance measurement applications, for example using string pots to measure displacement, measuring thermistors or RTDs for temperature, measuring the resistance on test samples, and many more applications. Some of our callers are surprised to learn that there’s a variety of different techniques to use to obtain accurate resistance measurements and that the choice of technique depends on the expected value. We also talk with callers who report getting weird readings, for example, “With the logger I’m using, I’m seeing numbers that don’t make sense.” This is usually resolved by realizing that resistance measurements span many different ranges which require the use of different measurement techniques.
In this white paper, we’ll cover a few simple ways to reduce error and improve accuracy at the low, mid, and high resistance ranges.
Use the Right Measurement Technique For Your Range
Resistance measurements are represented using the ohm unit (Ω). 1 ohm represents the resistance between 2 points of a conductor when a constant potential difference of 1 volt, applied to these points, produces a current of 1 ampere in the conductor, given that the conductor does not produce any electromotive force (voltage) on its own.
 Resistance is one of the few values in electronics that, in common applications, can vary over such a large range (over 12 orders of magnitude), and many users don’t take this into account when collecting data. For most applications, values less than 100 ohms can be considered as a low-range resistance measurement, while 100 ohms up to a million ohms (megohm) is an intermediate range. High resistance ranges go up from the megohm range, and we have had a few calls from users measuring way up in the gigaohm range (1 billion ohms). When callers ask us, “I need to measure resistance—what logger do you recommend?” our Application Specialists help them narrow it down by asking, “What’s the value of the expected resistance you’re trying to measure?”
Before starting your application, it is important to consider that each of these ranges requires the use of different measurement techniques. There’s no single technique for measuring every value of resistance, and you can easily get inaccurate results by using the wrong technique for your range. For example, without matching your technique to your range, your data may only be within 5% of the actual value.
In some applications, this isn’t a serious problem, but in other cases like measuring temperature using a thermistor, your measurements need to be much more accurate. For example, when measuring at the milliohm level or when measuring giga-ohm values, the quality of the connections and cabling can make a big difference in how accurate your readings will be. Of the three, mid-range measurement is the most straightforward, while very low and high-range measurements introduce problems that you’ll see in the form of measurement errors and lowered accuracy.
Ohm’s Law
The foundation of resistance measurement, Ohm’s Law states that the ratio of potential difference (V) across the ends of a conductor of resistance (R) to the current (I) flowing in that conductor will be constant, provided that the temperature also remains constant. For most applications you can use a basic Ohm’s Law equation of I = V/R where I is the current through the conductor (given in amperes), V is the potential difference measured across the conductor (given in volts), and R is the resistance of the conductor (here R is a constant given in ohms).
It’s easy to work with Ohm’s Law to find any of these values. For example, it’s also true that Resistance equals Voltage divided by Current (R=V/I), and that Voltage = Current multiplied by Resistance (V=I*R). In this way, you can derive any missing variable if you know the other two.
Low Resistance Measurement
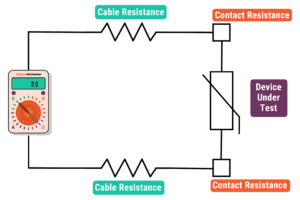
First, let’s consider the cables that are connecting the device to be measured to the instrument: If you’re measuring resistance near the source, you’ll get different readings than when you’re taking measurements from a sensor placed 200 ft away. As an example, say we have a 10-ohm copper RTD that we want to measure; we must connect to it somehow, so we connect a pair of wires to the RTD. But this wire isn’t a perfect conductor either—it has some resistance in it too, as with any piece of wire. If this resistance is 1 ohm per 100 ft. (typical for 20-gauge wire), and we have 200 ft. of cabling going to the device and coming back (400 ft. total) we may expect to see a resistance reading of 10 ohms, but what we’ll see is a reading of 14 ohms.
When measuring small resistances, a common technique is to force a known current and then measure the voltage across the Device Under Test (DUT–see Figure 1 below). This is by Ohm’s Law since you’re using the current and voltage to determine the resistance. Let’s assume you have a precision current source (for example 2 milliamps or 200 microamps), and you’ve got a highly accurate voltmeter.
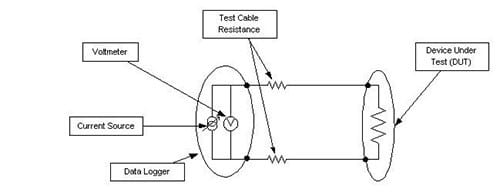
Figure 1. Forcing a Know Current
You run 2 wires one to each side of the resistor, then force the current through both sets of leads. However, this creates an error in your measurements because the voltage measured at the end of the leads isn’t the same as the voltage across the resistor, as it also includes the voltage drop across the wires between the meter and DUT caused by the current flowing through these wires. Therefore, in this case, you can reduce the error by taking a 4-wire measurement where you use one set of wires to carry the sourced current and a second set of wires to measure the voltage that you see across the resistor. This method provides a much more accurate result by eliminating the additional voltage drop caused by the current flowing through the leads from the measurement of the voltage across the DUT. In this case, it is assumed that the voltmeter draws negligible current which is usually the case with most data loggers.
For low resistance measurements, it is possible to use an alternative to the 4-wire measurement by eliminating one of the conductors and performing a 3-wire measurement. In this technique, you measure two voltages: the voltage across the resistor as well as the voltage across the conductor that carries the test current. After taking these measurements, you can determine the error due to the voltage drop in one of the leads. When you’ve determined the error, simply double it and subtract it from your measurements to get a more accurate reading. Many data loggers can perform 3-wire measurements including dataTaker data loggers and the Grant Squirrel series mentioned previously. With a 3-wire measurement, you save a piece of wire, but this setup assumes that the voltage drop in the two leads is identical—if this is not always the case and the voltage drop is uneven, you will encounter errors when using the 3-wire technique.
High Resistance Measurement
While most common resistance measurements fall between 0 and 100,000 ohms, specialized devices such as conductivity sensors or material test samples fall can have very high resistances, so you may have to use another technique at high resistances. For these measurements you can use a reliable technique which is the inverse of the one given above for measuring at low resistances–here we force a voltage and measure the current to calculate the resistance (again following Ohm’s Law). There are a few ways you can choose to do this.
The first method requires a high-precision instrument designed to measure very low currents. If you have a voltage source and a current meter with negligible resistance, you can simply force 5 volts through the meter connected in series with the DUT and measure the current. As an example, if the resistance value is a million ohms (1 megohm), the current here is reasonably small at 5μA. An alternate technique to measure large resistances is to use a voltage source in series with a known test resistance to excite the unknown resistance and then to measure the voltage across the test resistance (see Figure 2 below). Knowing the value of the test voltage source, the known resistance, and the voltage across this resistance–plus Ohm’s Law and a little algebra–allows you to calculate the value of the unknown resistance:
![]()
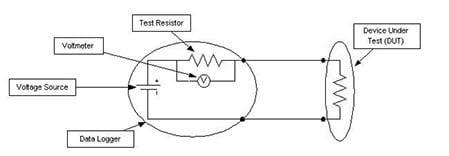
Figure 2. Sourcing Voltage Through a Known Resistor
For this technique to work well, the value of the test resistance should be similar to the value of the unknown resistance (within 1 to 2 orders of magnitude). Here again, your voltmeter must have good accuracy, otherwise, it’ll introduce an error in your measurements. Also, the voltmeter used to measure Vtest should not load the circuit, which is to say that its input impedance should be 100 to 1000 times greater than Rtest.
When measuring high resistance ranges, leakage current can affect accuracy. “Guarding” with shielded cable and a separate voltage source can prevent this, but requires specialized equipment. High resistance measurements may be inaccurate due to small currents and cable/DUT capacitance, requiring settling delays. Guarding can help with cable capacitance, but device capacitance settling must be considered. Troubleshoot with source voltage delays.
Intermediate Resistance Measurements
Intermediate resistance measurement typically falls between a few hundred ohms and 100,000 ohms. The technique used depends on the measuring device. Errors are less common in this range, and lower-cost loggers may use a voltage source while more expensive devices use a current source and voltmeter.
Summary
To obtain accurate resistance readings, it’s important to use the appropriate techniques based on the resistance range. For values below 10,000 ohms, the low resistance techniques can be used, while for values above 100,000 ohms, the force voltage technique is recommended. This will ensure higher accuracy in measurements.
For more information on resistance measurement or resistance data loggers, or to find the ideal solution for your application-specific needs, contact a CAS Data Logger Applications Specialist at (800) 956-4437 or request more information.