
New App Connects Your T&D Loggers to Your Smart Device
The T&D TR-4 Series Bluetooth-connected Data Loggers are the simplest wireless devices to set up and use that T&D has ever produced. All you need to get up and running is a T&D Data Logger and a Smart Device, such as a Cell Phone or Bluetooth-equipped Tablet. USA distributor CAS DataLoggers presents this guide authored by T&D showing how setup can be quickly accomplished by following the simple steps below.
I) Basic Setup
- The first step is to download T&D’s ThermoREC App to your Smart Device. This App can be found for FREE in the iOS Store or on Google Play.
- Make sure that Bluetooth is enabled on your Smart Device.
- Install the battery in your T&D TR-4 Series Data Logger.
- Open the App on your Smart Device.
That’s it! A new or initialized logger will auto-discover in just a matter of seconds (if it’s in range). At this point the logger will appear in the App and you will be able to see the current reading, as shown in the image on the right.
Only loggers that are in range will show in the App unless they are pinned to the Device. You can pin your logger to the device by tapping the star in the upper-left corner of the logger window. Initially the star will be greyed out, but once you tap it, the star will change to gold, indicating that the logger is now pinned to your device (See Figure 1 below). This will allow you to view locally-archived logger data once it is downloaded, even if the logger itself is not in range of your Smart Device.
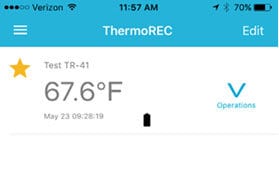
Downloading and other important functions can be accomplished by tapping the Operations Icon at the right side of the logger window.
II) T&D’s FREE Web-Storage Service
At this point you may want to decide if you will want to upload your logger data to T&D’s free cloud WebStorage Service. Once the data is uploaded there, you can view it from anywhere with a simple browser, share it with colleagues, archive it, download it for local archiving, print it locally, and view the battery status. Opening an account is simple. You can do so at the WebStorage Service site.
Once you have a User ID and Password, log onto your account and click on the Account button. There you will see a link to Add or Remove Devices (See Figure 2). Click on that to add your TR-4 Series logger to the account.

In the Add a Device screen, enter the serial number and registration code for your logger(s)(See Figure 3). This is included in the package with your logger. It is best if you apply it to the back of the unit so as not to lose it for future reference. After doing this, click on the Add button.
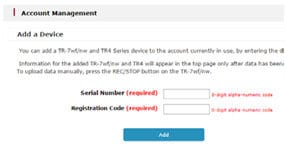
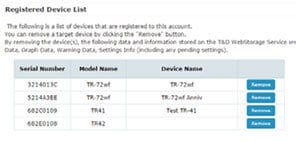
The logger will then be added to the Registered Device List without a name, as shown for the TR-42 below (unless you already gave the unit a name using the App). We will show how to add a logger name a little later in this guide.
At this point you may want to find your logger listed on the Top (main) page for your WSS account. However it won’t appear there yet. It will not show on the main page until a successful data upload has occurred. We will show how to do this below.
III) The Operations Menu
As can be seen below, there are several functions available from the
Operations menu:
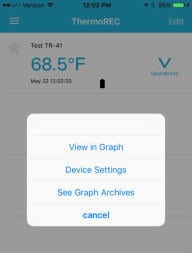
1. View in Graph
It is this function that will download recorded data to your Smart Device from your logger and, as it says, display it in graph form. At this point there will be no data to view as we have not started recording in the logger. We will do that in the Device Settings menu.
Later, when data has been recorded, be patient when you see the graph start to form. BTLE is not all that fast, and downloading a full logger will take a bit.
Important Note: It is using this function that will auto-upload the recorded logger data to your WebStorage Service account (if the logger is registered there). This will also cause the logger to start to appear on the WSS Top page.
2. Device Settings
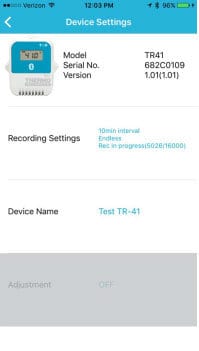
This is where you can set various parameters for your T&D logger. Initially you will want to set a Device Name for the logger that is meaningful for your application. After entering the new name, tap the blue button below to set it into memory.
Recording Settings is where you will select how you want the logger to record and it’s where you can choose for the readings to be in C° or F°. This is also where you start the logger recording and can stop it if you so choose.
As of this writing, Adjustment is not yet implemented. This will be used to enter a one- or two- point adjustment factor to be applied to logger readings as a result of calibration error.
The last selection on this page is Lock. This setting prevents unauthorized users from accessing the logger. This can be of concern in some situations due to the auto-discovery attribute of BTLE.
3. See Graph Archives
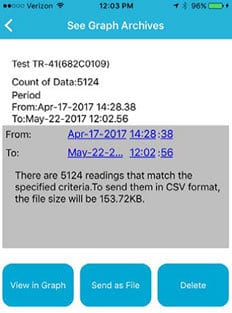
If you have pinned a logger to your Smart Device, selecting the See Graph Archives option will allow you to see the most recent data set that has been downloaded. The window provides specific information about the download and has buttons for three actions:
- View in Graph: This is covered above.
- Send as a File: This option will allow you to send a .csv file of the locally-archived data as an email attachment.
- Delete: Deletes data.
IV) The Main Menu
In the upper-left corner of the main screen you will find the main pull-down menu. “Main” may be a bit of a misnomer, but you will find some useful links here.
App Settings is the first one. Tapping on this will take you to a screen where you can toggle the Current Readings display to either Degrees C or Degrees F.
Below this are links to T&D’s website for support. At this point perhaps the most useful would be the Help link. Here you will find another resource for understanding how to use the TR-4 Series Loggers and the ThermoREC App. There is also a link to T&D’s main website and one labeled About Purchasing, which will take you to a list of T&D’s distributors worldwide.
Not included at the time of this writing, but planned for addition at a later date, will be a toggle for turning Daylight Savings Time on and off.
V) The Graph Display
The Graph Display is arguably the most important screen of the entire App. There are a number of very useful elements to the screen that may not be obvious at first glance.
Just opening the screen will start the monitoring process. It will also initiate automatic uploads to your WebStorage Service account, if the logger is registered there. The monitoring interval can be adjusted using the bottom slider located at the lower screen. Here the monitoring interval is shown at 5 seconds.
Monitoring can be paused by tapping the Pause icon. At the bottom of the screen we can see the Logger name and the current reading.

Of course the main point of this screen is the Graph Display itself. You can pinch in and out to change the graph range, both vertically and horizontally. The uppermost of the two sliders at the bottom of the screen allows you to set the data range shown in the graph.
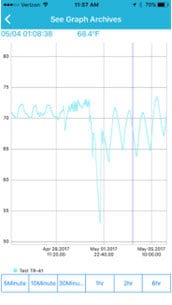
An important feature that is not obvious is that by pressing and holding for two seconds on the graph display, a cursor will appear. The time, date and value of the reading where the cursor is located will appear along the top of the graph. You can slide the cursor to view the exact reading at any point along the horizontal axis.
In a future version of the App, you’ll be able to select up to four devices to view in the graph at one time.
Note: This guide is a work in progress, just as is the ThermoREC App itself. As feedback is received, the App is improved, and new features are added, this guide will be updated. Also note that here may be minor differences between the Android and iOS version of the ThermoRec App.
For more info on the T&D TR-4 Series Bluetooth Data Loggers, or to find the ideal solution for your application-specific needs, contact a CAS DataLoggers Application Specialist at (800) 956-4437.